Getting Started
In this article, the set-up of the Adapter is explained step by step. Additionally, you can try out some of the functionalities of the Adapter following the instructions in this article.
What you'll need
- An IDE of your choice (IntelliJ recommended)
- Java 17
- Maven
- Camunda Modeler
- Postgres or Docker (to set up postgres database)
- Postman or any similar tool for creating API requests
- Working KADAI application (e.g. see our Spring-Boot-Example here)
Note: Please name your packages, folders and files exactly like in the example!
Step 0 (optional): Initialize an empty Camunda application
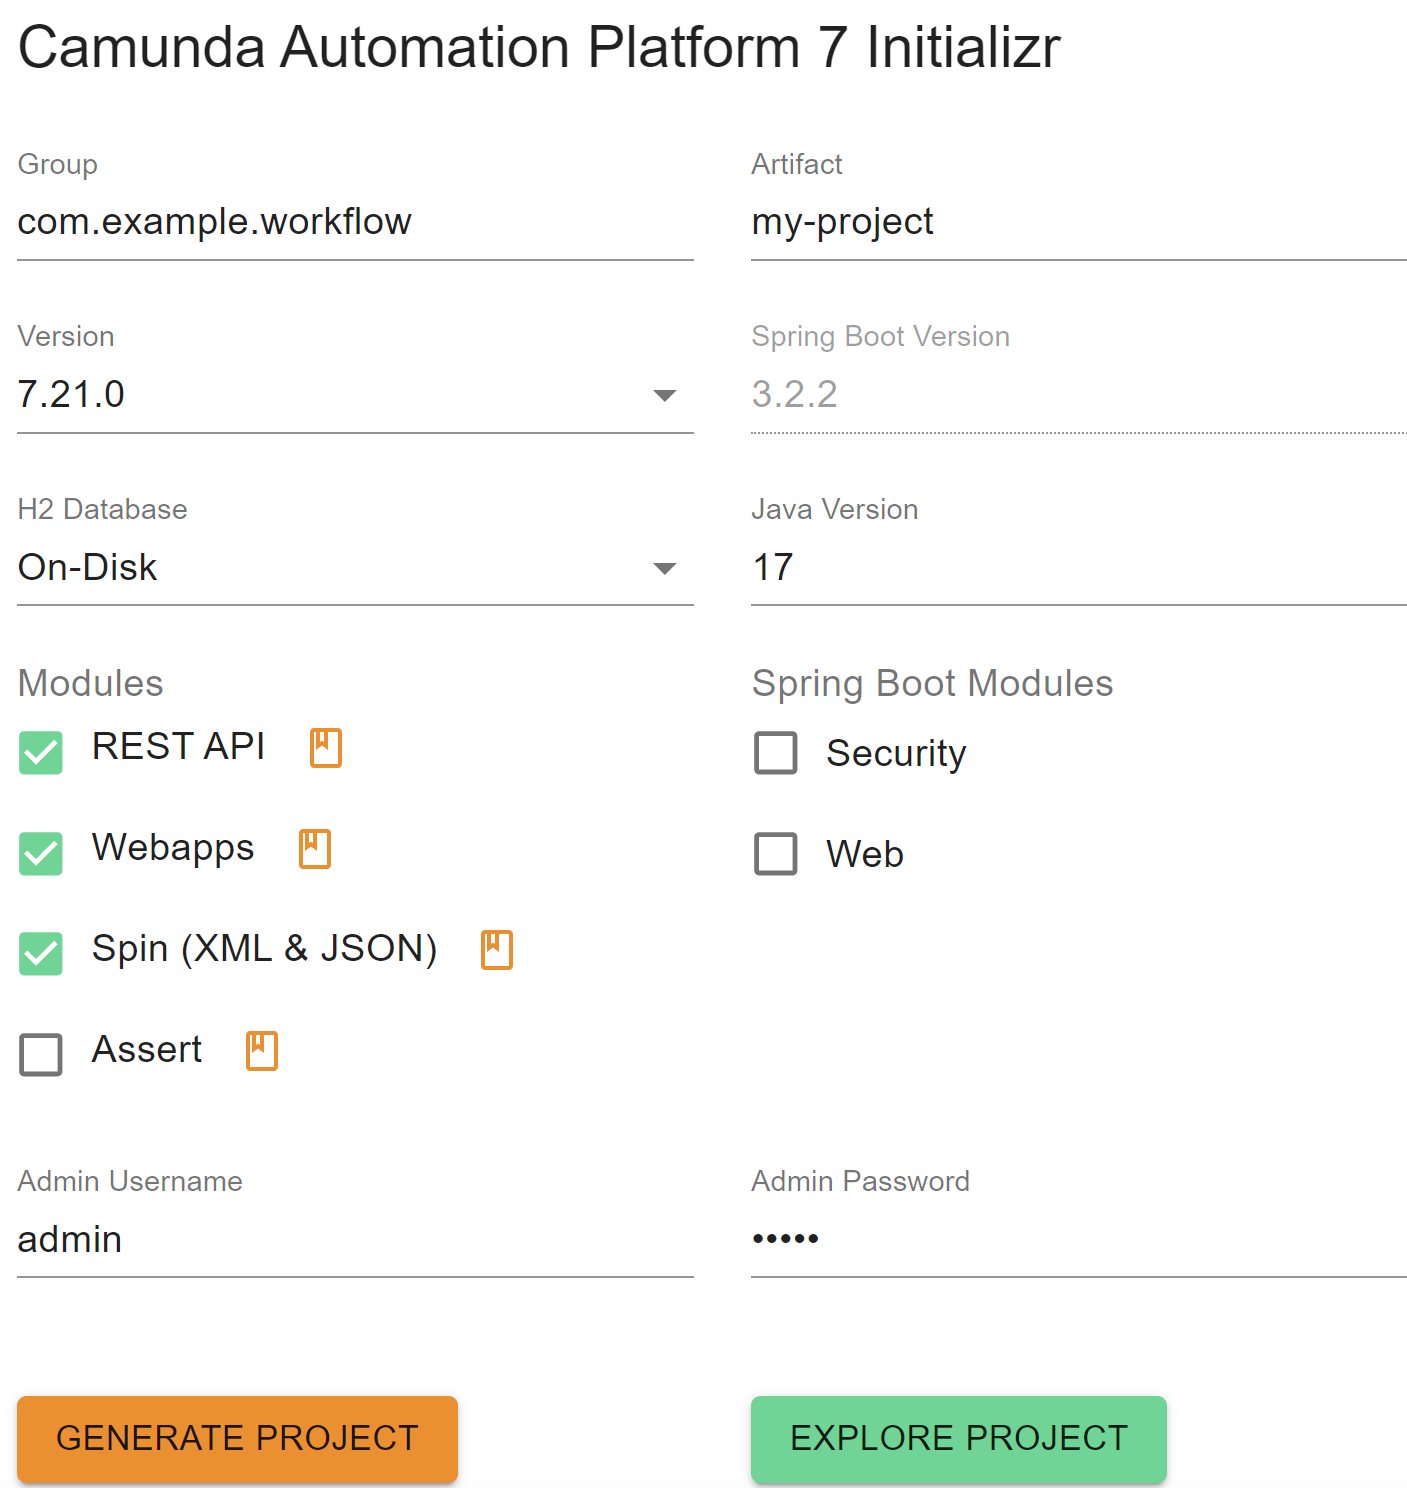
If you don't have a Camunda application that you could use for experimenting with the Adapter, install a new application. You can use https://start.camunda.com/ to initialize an empty application. You need to choose Java 17. Additionally, make sure that the modules "REST API", "Webapps" and "Spin" are chosen and set an admin username and password of your choice.
Unpack the project in a folder of your choice and open it in your IDE.
Step 1: Configure your Camunda application
Add a new extension property to your User Tasks. The name of the property should be kadai.classification-key. It should have an existing classification key as value. If you are using the KADAI example application, you can enter "L1050" as value.
Add following dependencies to the dependencies section of your pom:
<dependency>
  <groupId>io.kadai</groupId>
  <artifactId>kadai-adapter-camunda-outbox-rest-spring-boot-starter</artifactId>
  <version>10.1.0</version>
</dependency>
<dependency>
  <groupId>org.jboss.resteasy</groupId>
  <artifactId>resteasy-servlet-spring-boot-starter</artifactId>
  <version>6.2.0.Final</version>
</dependency>
<dependency>
  <groupId>org.camunda.spin</groupId>
  <artifactId>camunda-spin-dataformat-json-jackson</artifactId>
</dependency>
<dependency>
  <groupId>org.postgresql</groupId>
  <artifactId>postgresql</artifactId>
</dependency>
You need to exclude the following from the org.camunda.bpm.springboot dependency with the artifact ID "camunda-bpm-spring-boot-starter-rest":
<dependency>
  <groupId>org.camunda.bpm.springboot</groupId>
  <artifactId>camunda-bpm-spring-boot-starter-rest</artifactId>
  <exclusions>
    <exclusion>
      <groupId>org.skyscreamer</groupId>
      <artifactId>jsonassert</artifactId>
    </exclusion>
  </exclusions>
</dependency>
Then, add a repository to the pom:
<repositories>
  <repository>
    <id>jboss-public-repository</id>
    <name>JBoss Repository</name>
    <url>https://repository.jboss.org/nexus/content/groups/public</url>
  </repository>
</repositories>
Add the following configuration of Kadai-Outbox to your resources folder:
kadai.adapter.outbox.schema = kadai_tables
kadai.adapter.outbox.max.number.of.events = 57
kadai.adapter.create_outbox_schema = true
kadai.adapter.outbox.initial.number.of.task.creation.retries = 5
kadai.adapter.outbox.duration.between.task.creation.retries = PT1H

#kadai.adapter.outbox.datasource.jndi=java:jboss/datasources/ProcessEnginePostgres
#kadai.adapter.outbox.datasource.jndi=jdbc/ProcessEngine

kadai.adapter.outbox.datasource.driver=org.postgresql.Driver
kadai.adapter.outbox.datasource.url=jdbc:postgresql://localhost:5102/postgres
kadai.adapter.outbox.datasource.username=postgres
kadai.adapter.outbox.datasource.password=postgres

#kadai.adapter.outbox.datasource.url=jdbc:h2:mem:camunda;NON_KEYWORDS=KEY,VALUE;IGNORECASE=TRUE;LOCK_MODE=0;DB_CLOSE_ON_EXIT=FALSE;
#kadai.adapter.outbox.datasource.driver=org.h2.Driver
#kadai.adapter.outbox.datasource.username=sa
#kadai.adapter.outbox.datasource.password=sa
Further add the following properties to your Spring Boot configuration:
server.port=8081
spring.main.allow-bean-definition-overriding=true
camunda.bpm.auto-deployment-enabled=true

server.servlet.context-path=/example-context-root
camunda.bpm.admin-user.id=admin
camunda.bpm.admin-user.first-name=admin
camunda.bpm.admin-user.password=admin
camunda.bpm.admin-user.last-name=admin

camunda.bpm.database.type=postgres

# new mandatory field starting from camunda version 7.20
# see https://forum.camunda.io/t/camunda-7-20-history-time-to-live-cannot-be-null-cannot-deploy-wf-created-in-7-18/48159
camunda.bpm.generic-properties.properties.historyTimeToLive: P180D

# properties for resteasy-servlet-spring-boot-starter
# without these 2 propertiers the camunda-context is registered twice
resteasy.jaxrs.app.registration=property
resteasy.jaxrs.app.classes=io.kadai.adapter.camunda.outbox.rest.config.OutboxRestServiceConfig

spring.datasource.url=jdbc:postgresql://localhost:5102/postgres
spring.datasource.driver-class-name = org.postgresql.Driver
spring.datasource.username = postgres
spring.datasource.password = postgres

#spring.datasource.url=jdbc:h2:mem:camunda;NON_KEYWORDS=KEY,VALUE;IGNORECASE=TRUE;DB_CLOSE_ON_EXIT=FALSE;
#spring.datasource.driverClassName=org.h2.Driver
#spring.datasource.username=sa
#spring.datasource.password=sa
Check if your postgres database is running. For example, start the container provided in the KADAI repository by executing bash ./docker-databases/prepare_db.sh POSTGRES_14 && exit in a terminal.
Then start the camunda application and check if it runs correctly.
The webapp should be available at
http://localhost:8081/example-context-root/camunda/app/welcome/default/#!/login
Close the camunda application after checking.
Step 2: Initialize an empty Adapter application
Use this Spring Initializr-Configuration to create an example Maven Project.
It is already configured to our needs, you can simply click GENERATE.
Unpack the project and open it in an IDE of your choice. Your project-structure should look like below:
demo
├───.mvn
│   └───wrapper
├───src
│   ├───main
│   └───test
│   .gitignore
│   HELP.md
│   mvnw
│   mvnw.cmd
│   pom.xml
Step 3: Configure your Adapter application
Add the following dependencies to the dependencies section of your pom (if they don't already exist):
<dependencies>
  <dependency>
    <groupId>org.springframework.boot</groupId>
    <artifactId>spring-boot-starter-web</artifactId>
  </dependency>
  <dependency>
    <groupId>org.springframework.boot</groupId>
    <artifactId>spring-boot-configuration-processor</artifactId>
    <optional>true</optional>
  </dependency>
  <dependency>
     <groupId>io.kadai</groupId>
    <artifactId>kadai-adapter</artifactId>
    <version>10.1.0</version>
  </dependency>
  <dependency>
    <groupId>io.kadai</groupId>
    <artifactId>kadai-adapter-camunda-system-connector</artifactId>
    <version>10.1.0</version>
  </dependency>
  <dependency>
    <groupId>io.kadai</groupId>
    <artifactId>kadai-adapter-kadai-connector</artifactId>
    <version>10.1.0</version>
  </dependency>
  <dependency>
    <groupId>com.ibm.db2</groupId>
    <artifactId>jcc</artifactId>
  </dependency>
  <dependency>
    <groupId>org.postgresql</groupId>
    <artifactId>postgresql</artifactId>
  </dependency>
  <dependency>
    <groupId>com.h2database</groupId>
    <artifactId>h2</artifactId>
  </dependency>
</dependencies>
Add the following annotations to your AdapterApplication, and import the packages correspondingly:
@EnableScheduling
@ComponentScan(basePackages = "io.kadai.adapter")
@Import({AdapterConfiguration.class})
Add the following files to your resources folder:
application.properties
######################################################################################
## Adapter properties
######################################################################################
##
#logging.level.org.springframework=DEBUG
logging.level.io.kadai=DEBUG
#logging.level.com.spring.ibatis=DEBUG
#logging.level.com.spring.ibatis.*=DEBUG
#logging.level.org.apache.ibatis=DEBUG

#logging.level.io.kadai=info

## Set Server Port for Adapter
server.port = 8083
spring.main.allow-bean-definition-overriding=true

kadai.adapter.run-as.user=taskadmin
kadai.adapter.scheduler.run.interval.for.start.kadai.tasks.in.milliseconds=10000
kadai.adapter.scheduler.run.interval.for.complete.referenced.tasks.in.milliseconds=10000
kadai.adapter.scheduler.run.interval.for.claim.referenced.tasks.in.milliseconds=10000
kadai.adapter.scheduler.run.interval.for.cancel.claim.referenced.tasks.in.milliseconds=10000
kadai.adapter.scheduler.run.interval.for.check.finished.referenced.tasks.in.milliseconds=10000

kadai-system-connector-camunda-rest-api-user-name=admin
kadai-system-connector-camunda-rest-api-user-password=admin
kadai-system-connector-outbox-rest-api-user-name=admin
kadai-system-connector-outbox-rest-api-user-password=admin
####################################################################################
# System connector properties
####################################################################################
#
# Set URLs of Camunda REST API and associated KADAI Outbox REST API. The format is
# <camundaSystem1-RestURL> | <camundaSystem1-OutboxRestURL> , ..., <camundaSystemN-RestURL> | <camundaSystemN-OutboxRestURL>

kadai-system-connector-camundaSystemURLs=http://localhost:8081/example-context-root/engine-rest | http://localhost:8081/example-context-root/outbox-rest

####################################################################################
# Kadai-connector properties
####################################################################################
#
# Configure the datasource for Kadai DB (used by kadai-connector)
#kadai.datasource.jdbcUrl = jdbc:h2:tcp://localhost:9095/mem:kadai;NON_KEYWORDS=KEY,VALUE;IGNORECASE=TRUE;LOCK_MODE=0;
#kadai.datasource.jdbcUrl=jdbc:h2:mem:kadai;NON_KEYWORDS=KEY,VALUE;IGNORECASE=TRUE;LOCK_MODE=0;DB_CLOSE_ON_EXIT=FALSE
#kadai.datasource.driverClassName = org.h2.Driver
#kadai.datasource.username = sa
#kadai.datasource.password = sa
kadai.schemaName=kadai
#
# kadai.datasource.jdbcUrl=jdbc:db2://localhost:50050/kadai
# kadai.datasource.driverClassName=com.ibm.db2.jcc.DB2Driver
# kadai.datasource.username=db2user
# kadai.datasource.password=Db2password

kadai.datasource.jdbcUrl=jdbc:postgresql://localhost:5102/postgres
kadai.datasource.driverClassName=org.postgresql.Driver
kadai.datasource.username=postgres
kadai.datasource.password=postgres

kadai.adapter.mapping.default.objectreference.company=DEFAULT_COMPANY
kadai.adapter.mapping.default.objectreference.system=DEFAULT_SYSTEM
kadai.adapter.mapping.default.objectreference.system.instance=DEFAULT_SYSTEM_INSTANCE
kadai.adapter.mapping.default.objectreference.type=DEFAULT_TYPE
kadai.adapter.mapping.default.objectreference.value=DEFAULT_VALUE
management.endpoints.web.exposure.include= *
management.endpoint.health.show-details= always
management.health.external-services.include=external-services
management.health.external-services.enabled=true
#
#kadai.adapter.xsrf.token=YOUR_TOKEN_123
You can enable Kadai Adapter to send CSRF Headers and Cookies by removing the comment from the kadai.adapter.xsrf.token property.
kadai.properties
kadai.roles.user=group1 | group2|teamlead-1 |teamlead-2 |user-1-1| user-1-1| user-1-2| user-2-1| user-2-2| max|elena|simone
kadai.roles.Admin=name=konrad,Organisation=novatec|admin
kadai.roles.business_admin=max|Moritz|businessadmin
kadai.roles.task_admin=peter | taskadmin
kadai.roles.monitor=john|teamlead_2 | monitor
kadai.domains=DOMAIN_A|DOMAIN_B|DOMAIN_C
kadai.classification.types=TASK|DOCUMENT
kadai.classification.categories.task=EXTERNAL| manual| autoMAtic| Process
kadai.classification.categories.document=EXTERNAL
kadai.jobs.enabled=false
Step 4: Add SPIs to your Adapter application
SPIs need to be additionally specified in the Adapter application. You can read more about SPIs here.
The necessary SPI for the Adapter application can be built as follows: First, create a new package with the name taskrouting.
Then, create a class in the package taskrouting with the name ExampleTaskRouter. It should look like this:
package com.example.demo.taskrouting; //or your own path depending on your packages
import io.kadai.common.api.KadaiEngine;
import io.kadai.spi.routing.api.TaskRoutingProvider;
import io.kadai.task.api.models.Task;

/** This is a sample implementation of TaskRouter. */
public class ExampleTaskRouter implements TaskRoutingProvider {

  @Override
  public void initialize(KadaiEngine kadaiEngine) {
    // no-op
  }

  @Override
  public String determineWorkbasketId(Task task) {
    return "WBI:100000000000000000000000000000000001";
  }
}
Next, add a new folder to your resources folder and name it META-INF.
Create a new folder named services inside of the folder META-INF.
Finally, in the services folder, create a file named io.kadai.spi.routing.api.TaskRoutingProvider.
This file must contain the fully qualified classname (including the package) of the class ExampleTaskRouter, for example:
com.example.demo.taskrouting.ExampleTaskRouter
Make sure there aren't any empty lines in this file. The finished structure of the source folder should look like this:
demo
├───.mvn
├───src
│   ├───main
│   │   ├───java
│   │   │   └───com
│   │   │       └───example
│   │   │           └───adapter
│   │   │               │───taskrouting
│   │   │               │       ExampleTaskRouter.java
│   │   │               │───AdapterApplication.java
│   │   └───resources
│   │       │───META-INF.services
│   │               io.kadai.spi.routing.api.TaskRoutingProvider
│   │       │───application.properties
│   │       │───kadai.properties
│   ...
│   pom.xml
Step 5: Start all applications together
Then, start your KADAI application. Make sure to use the same version as specified in the pom.xml of your adapter. Start your camunda app next, and login. Last, start the adapter.
Step 6: Try out different functionalities of Adapter
-
Start a process with a User Task in Camunda. You can use this example process:
The User Task should be imported to KADAI automatically. You can check it by first knowing the name of the user task from the started process, then make a postgres GET request to KADAI using the following request, entering the name (or just substring of the name) of the user task for the "name-like" attribute.
GET http://localhost:8080/kadai/api/v1/tasks?name-like=Say helloMake sure that the correct port number is used for KADAI request. You can check the port number in
application.propertiesof KADAI underserver.port. If not specified, then the default port is8080. You have to authenticate yourself using Basic Auth: In Postman, go to the "Authorization" tab. There, selectbasicAuthand typeadminas user andadminas password. Make sureenableCsrfis set to false in theapplication.propertiesof the KADAI application.The response to the request should look like this:
{
  "tasks": [
    {
      "taskId": "TKI:40deb1b2-ce28-4b74-a250-f19852f43bf",
      "externalId": "8793b74b-1f34-11ef-b35c-a0294240468e",
      "created": "2025-02-17T16:16:51.910Z",
      "claimed": null,
      "completed": null,
      "modified": "2025-02-18T16:16:51.910Z",
      "planned": "2025-02-17T16:16:51.910Z",
      "received": null,
      "due": "2025-02-18T16:16:51.910Z",
      "name": "Say Hello",
      "creator": "taskadmin",
      "note": null,
      "description": "Widerruf",
      "priority": 1,
      "manualPriority": -1,
      "state": "READY",
      "numberOfComments": 3,
      "classificationSummary": {
        "classificationId": "CLI:100000000000000000000000000000000016",
        "key": "L1950",
        "applicationEntryPoint": "",
        "category": "EXTERNAL",
        "domain": "DOMAIN_A",
        "name": "Widerruf",
        "parentId": "",
        "parentKey": "",
        ...
      },
      ...
    },
    ...
  ]
} -
Claim the KADAI Task from the previous step using Postman. Make sure you add the following property to the
application.propertiesfile of the adapter application:kadai.adapter.camunda.claiming.enabled=true, then restart the adapter. To send the POST request, use the same authorization as in the previous step. The Task should get claimed in Camunda automatically.POST http://localhost:8080/kadai/api/v1/tasks/{taskid}/claimYou can check that the task in KADAI is also claimed by making the same GET Request as in Step 1 and see the
claimedattribute. -
Complete the KADAI Task from the previous step using Postman. To send the POST request, use the same authorization as in the previous step. The Task should disappear from Camunda Tasklist.
POST http://localhost:8080/kadai/api/v1/tasks/{taskid}/complete
More functionalities like the cancelling of a claimed task and their URLs can be found in the full documentation of the REST-API.